On completion of this stage you should be familiar with the following concepts:
|
Modeling notions: |
Re-factoring |
|
Modeling techniques: |
Deleting model elements |
In this stage you will add a Cancel Requisition button, in the Open Requisitions view. Canceling a requisition is performed simply by setting its Status field to Canceled.
This will be followed by a Reject Requisition button, in the Requisition Approval view, setting the Status field to Rejected.
This stage’s modeling should be performed in the Tutorial 6-7 project, you imported at the end of the previous stage.
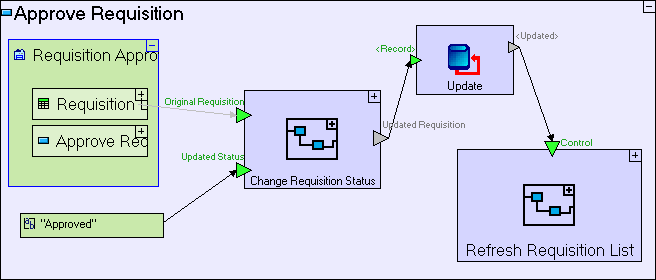
The Cancel Requisition and Reject Requisition models are very similar to the Approve Requisition model we created in the previous stage, so let’s recall how it was modeled:
Of-course, we cannot reuse the Approve Requisition model as-is, because it depends on some elements which are specific to it, and may be different for Cancel Requisition and Reject Requisition, as illustrated in the following table:
|
Model Element |
Approve Requisition |
Cancel Requisition |
Reject Requisition |
|
View (ancestor reference) |
Requisition Approval |
Open Requisitions |
Requisition Approval |
|
Status constant |
“Approved” |
“Canceled” |
“Rejected” |
|
The refresh process to be executed following the Update |
Refresh Requisition List (from the Requisition Approval package) |
Refresh Requisition List (from the Open Requisitions package) |
Refresh Requisition List (from the Requisition Approval package) |
Other than these elements all other elements of the model are identical, so it makes sense to change the model by grouping all the reusable functionality in a separate process. This modeling technique (re-arranging the model differently) is referred to as Re-factoring.
We shall begin the re-factoring of the Approve Requisition button by creating the reusable process:
Zoom to Approve Requisitions.
Drop a Basic/Action template into Approve Requisitions.
Name it Update Requisition, and zoom into it.
Next, copy into the newly created process the reusable functionality we outlined above:
Drag and drop the following processes from the repository (or outline): Change Requisition Status and Update.
Create Flow linking the Change Requisition Status/Updated Requisition exit to Update/<Record> trigger.
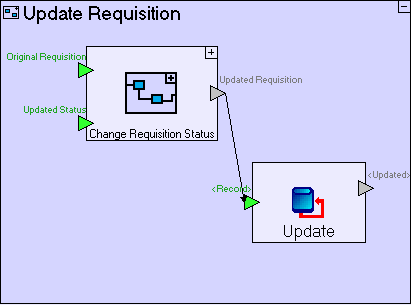
The Update Requisition process should look similar to the following:
The slots which have no flow connected to them hint at what we should handle next. Recall, that all the slots in question (e.g. the trigger Original Requisition) were originally the target or source for flows from/to elements which we cannot reuse. We should add corresponding slots to the Update Requisition process we are now modeling, so that the non-reusable elements could be specified outside the reusable process.
Place a Trigger on the upper left frame of Update Requisition. Name it (using [F2]) Selected Requisition.
Create Flow linking this trigger to Change Requisition Status/Original Requisition.
Place a second Trigger on the left frame of Update Requisition. Name it Status Value.
Create Flow linking this trigger to Change Requisition Status/Updated Status.
Place an Exit on the right frame of Update Requisition frame.
Create Flow linking the Update/<Updated> exit to this exit.
The Update Requisition process should look similar to the following:

To finish the Re-factoring, we need to clean-up Approve Requisition by redefining flow to/from the Update Requisition process and removing redundant elements.
Collapse (clicking
![]() in the top-right corner of) Update
Requisition process (to minimize confusion or
mistakes).
in the top-right corner of) Update
Requisition process (to minimize confusion or
mistakes).
Zoom out to Approve Requisition.
Redefine 3 Flows:
Click on the Flow connecting the Requisition Approval display data element with the Change Requisition Status/Original Requisition trigger, to select it.
Click on the Flow’s
target anchor (![]() )
and drag it onto the Update
Requisition/Selected Requisition trigger.
)
and drag it onto the Update
Requisition/Selected Requisition trigger.
Select the Flow connecting the “Approved” constant to Change Requisition Status/Updated Status trigger.
Click on the Flow’s
target anchor (![]() )
and drag it onto the Update
Requisition/Status Value trigger.
)
and drag it onto the Update
Requisition/Status Value trigger.
Select the Flow connecting the Update process to the Refresh Requisition List process.
Click on the Flow’s
source anchor (![]() )
and drag it onto the exit of Update
Requisition.
)
and drag it onto the exit of Update
Requisition.
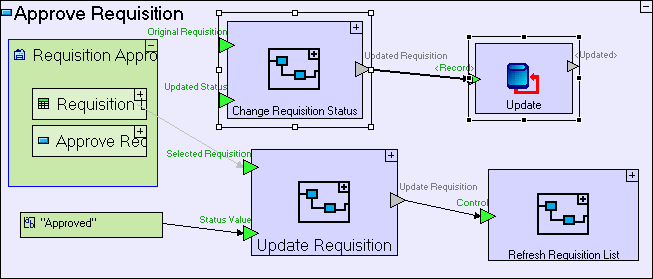
The model now looks similar to the following:
We should remove the redundant elements appearing at the top of the screenshot.
Select each of the redundant elements Change Requisition Status, Update, and the flows linking them, and delete them by pressing [Del].
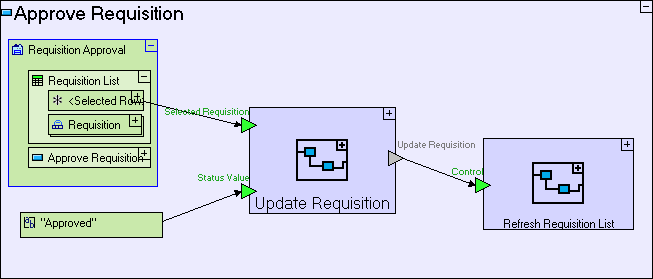
Now the re-factoring of Approve Requisition is complete and the model should look similar to the following:
Save your work and view the application in the browser. There should be no difference as to how it looks or functions.
Make sure that the Approve Requisition button still functions correctly.
We shall now create the Cancel Requisition button in the Open Requisitions view which should be similar to the Approve Requisition button.
Zoom to the Open Requisitions view.
Drop a Display/Button template next to the New Requisition button.
Name it Cancel Requisition.
Zoom into Cancel Requisition.
Now create a model similar to Approve Requisition (use the previous screenshot as a reference), reusing the Update Requisition process:
Drag–and-drop the Update Requisition process we've just created from the outline to Cancel Requisition.
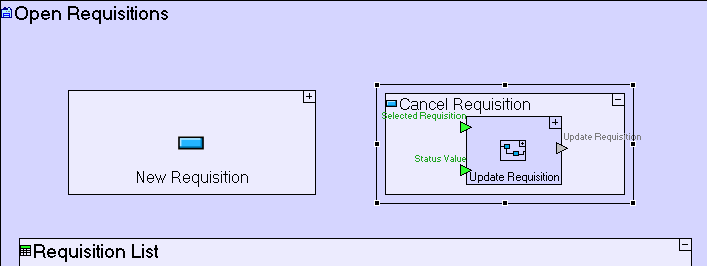
The Open Requisitions view model now looks similar to the following:
Create a reference to the view, from which the Requisition List is to be retrieved:
Right-click on Cancel Requisition, select Add Ancestor Reference, and choose Open Requisitions.
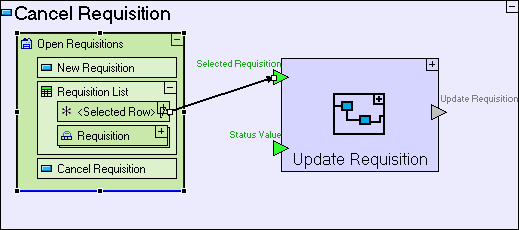
Create Flow linking the Requisition List/<Selected Row> element in the Open Requisitions ancestor reference to the Update Requisition/Selected Requisition trigger.
The Cancel Requisition button model now looks similar to the following:
Define a new constant, “Canceled”:
Add a Constants/Text from the palette. Name it Canceled.
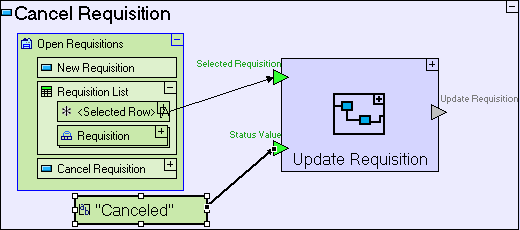
Create Flow linking “Canceled” to Update Requisition/Status Value.
The model now looks similar to the following:
And to finish off, refresh the view following status update by reusing an existing refresh process:
Drag-and-drop the Refresh Requisition List (the one used in the Submit button of the Enter New Requisition popup) from the repository (or outline) to Cancel Requisition.
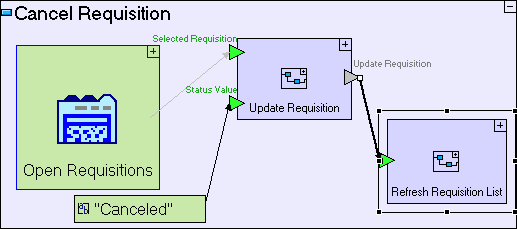
Create Flow linking the Exit of Update Requisition to the trigger of Refresh Requisition List.
The Cancel Requisition button is now complete, and should look similar to the following:
Save your work and view the application in the browser, which should look similar to the following:

Make sure that the Cancel Requisition button (in the Open Requistion view) functions correctly.
Import the sample project Tutorial 7-8 and use it as the basis for the next stage of the tutorial.
For a reminder on how to import a sample project, see the Importing a Sample Project section at the end of Stage 2.
This sample project contains all the functionality modeled thus far.
The sample project also includes additional functionality as follows:
1. Add a Button Row to Open Requisitions view and place the buttons in it, for a neater display
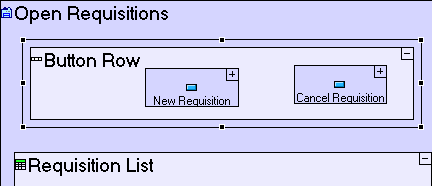
|
How to Model |
Located in |
|
Drag a Display/Row template. Name it Button Row. |
Open Requisitions view |
|
Drag New Requisition and Cancel Requisition from the outline/repository |
Button Row |
|
Delete New Requisition and Cancel Requisition buttons |
Open Requisitions view |
2. Add a Button Row to Requisition Approval view, for a neater display
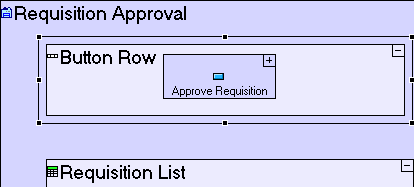
|
How to Model |
Located in |
|
Drag a Display/Row template. Name it Button Row. |
Requisition Approval view |
|
Drag Approve Requisition from the outline/repository |
Button Row |
|
Delete Approve Requisition |
Requisition Approval view |
3. Add a Reject Requisition button to the Requisition Approval view, recreating the modeling performed for Approve Requisition and Cancel Requisition
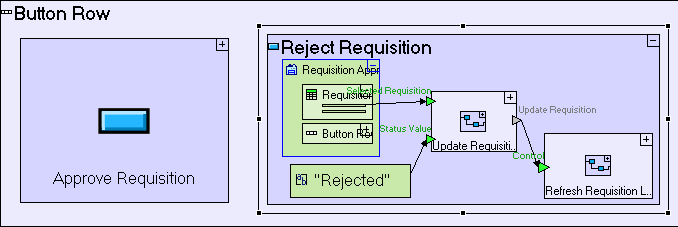
|
How to Model |
Located in |
|
Drag a Display/Button template and name it Reject Requisition. |
Requisition Approval/Button Row |
|
Reuse the Update Requisition process. Add an ancestor reference to the Requisition Approval view. Create a new text constant “Rejected”. Reuse the Refresh Requisition List process (from the Requisition Approval package). Create flows identical to those of Approve Requisition. |
Reject Requisition button |
You may now proceed to Stage 8, in which we shall fine-tune the retrieval of requisitions in both views to make sure that only the relevant requisitions appear in each view.
Click here to open the live project in a separate window.